This article is more than 1 year old
The netbook newbie's guide to Linux
'We're the Fukarwi'
We'll start by creating an empty directory, the 'mountpoint'. In accordance with long Unix tradition, this belongs under the /mnt directory. Navigate there with the following terminal command: cd /mnt
...and create the directory there like this:
sudo mkdir mountpoint
Of course, mountpoint is just an arbitrary name - you can call it whatever you like. Now we're ready to do the business:
sudo mount -t cifs -o user=bidmead,pass=whatever //192.168.1.11/MyShare /mnt/mountpoint
This kind of mount command can only be carried out by the superuser - the system supervisor - which is why we proceed the command with sudo. The -o flag tells mount that an extra parameter follows, and as it's only a single parameter there can be no spaces in the string defining the username and password. Obviously, you'll insert your own username and password here. Likewise, your networked machine's IP address and share name.

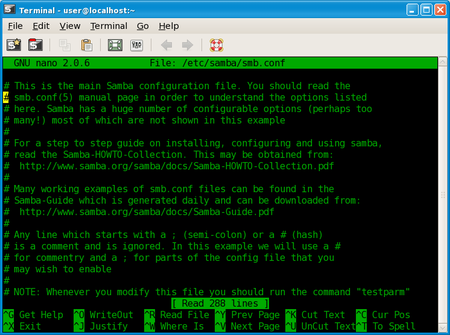
Editing smb.conf in Nano
Now use the standard AA1 interface to run the File Manager app. By default, it won't let you navigate to the root of the Linux file structure, so you'll have to insert a / up in the navigation bar to get there. Now go to the mountpoint you created, and you should see your Windows files there. If you have trouble accessing them it may help to loosen up the permissions you've set on the shares at the Windows end.
Users of the Asus Eee PC may be amused at these shenanigans. It's true that the Xandros version of Linux supplied with the Asus machine comes with a File Manager that already knows its way around a Windows network. And if your Windows Workgroup has the default name of "WORKGROUP", you'll be okay. My workgroup happens to be called "BIDSOWN", and the Asus GUI doesn't seem to provide a way of changing this.
But it's easy enough from the command line. Again, you need to become the root user - the supervisor - or use the sudo command. The machine's Windows workgroup is defined in a file called smb.conf which is in the /etc/samba directory. This is pretty well standard, and the MSI Wind's Suse Linux implementation keeps smb.conf in the same place, except that its default workgroup name is TUX-NET.
The Wind offers a comprehensive GUI route to setting the Windows workgroup name through the front end to its system configurator, Yast - it stands for Yet Another Setup Tool. But it's simpler just to edit smb.conf directly. For this we'll use less again. For safety's sake we'll make a backup of this file first:
sudo cp /etc/samba/smb.conf /etc/samba/smb.conf.orig
Now we'll use less again:
sudo less /etc/samba/smb.conf
Scroll through until you find a section marked "[global]" and a line that says "workgroup = <something-or-other>". Less is a viewer, not an editor, but if you hit the 'v' key it will run whatever utility has been set up as the default editor. In the case of the MSI Wind, this editor will be the venerable old Unix standby, vi. I don't need to tell you how to use that here, because the MSI Wind Suse Linux implementation comes complete with all the Unix man - for 'manual' - pages. If your machine is an MSI Wind, just type man vi. Eee PC users also have the man pages - they're missing from the AA1, though - but they won't need them here because the default editor is the very much easier to use nano, which offers a self-explanatory interface.
Next Time... After dipping a tentative toe into the Linux command line, it's time to start wading up to our ankles by exploring some of the basic commands common to the various Linux implementations - as well as discussing the differences between them.
The Important Bits
- Apt-get - the command-line application installer on most Linux systems.
- Root - the nickname for the user with full access to a Linux system. Also the name of the top of the file hierarchy, which is written as /
- smb.conf - the Samba Windows file-sharing system's configuration file. You'll find it in
/etc/samba/ - Sudo - the command that gives you run a second command as if you had full access to the system.
- Terminal - the beginning, not the end, of Linux.
- Yum - the Acer Aspire One's command-line application installer.
