Original URL: https://www.theregister.com/2014/02/14/lohan_pi/
LOHAN cops a faceful of Raspberry Pi
Vulture 2 spaceplane's Picam captures fetching rear-end selfie
Posted in Science, 14th February 2014 13:25 GMT
The Low Orbit Helium Assisted Navigator (LOHAN) team is methodically working its way through the installation of the Vulture 2 spaceplane's electronic systems, and having got the Pixhawk autopilot up and running, we were able to turn our attention this week to the onboard Raspberry Pi.
LOHAN regulars will know that we use a Model A Pi rig for tracking and high-altitude imaging, the latter via the diminutive Picam.
With somewhat more than a tad of trepidation, the first step in the Pi installation was to mount the Picam in underside of the aircraft's nose, behind the 3D Robotics digital airspeed sensor probe:

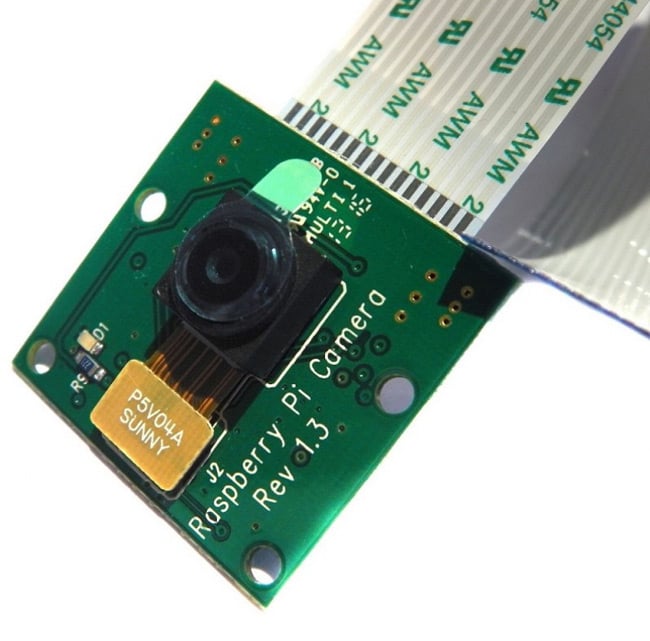
In contrast to other components, which are fixed to enable removal/replacement if required, the Picam is epoxied into place. The reason for this is that we really don't want any supersonic airflow entering the Vulture 2's beak, so a proper seal is in order.
Here's the Picam board inside the nose, with the airspeed sensor board at right:

Of course, if there's a problem with the Picam, we've got a right faff on our hands to get it out again, so it was expedient to mount the Pi board, connect the camera and check all was well before proceeding with other tasks.
The Pi sits above the canard servos atop some anti-slip mat and screwed into the wooden servo mounting blocks. Rubber washers provide additional damping, and here's a fetching view with the canards in place to check clearance of the control rods. The black and red wires emerging underneath the GPIO pins are for eventual connection of the Pi rig to its battery supply (more on that in a bit):

One important step before placing the Pi was to grab a pIO microSD card adaptor:

This solves a serious vulnerability issue. The standard adaptor sticks out from the board, exposing it to the risk of getting knocked or vibrated loose. The pIO positions the card right under the Pi, with a rock-solid connection:

So, with that sorted, the fun and games could begin. Since this is a new Pi, it fell to me to get it up and running, and I'm ashamed to admit that what I know about such things can be written on the back of an extremely small slice of punched tape.
Nonetheless, it's said that 12-year-olds worldwide are wrangling Pis with ease, and in the absence of a handy 12-year-old to do the job for me, I downed a couple of stiff brandies and got to it.
Here's the whole thing hooked up using the highly recommended PiHub:

Note that I had to unscrew the Pi to connect the power cable to the end of the board facing the aircraft's nose. That won't be an issue once the Pi's running off the aforementioned battery supply.
I rather noobily got an SD card preloaded with a selection of OSes, and installed Raspbian - Pi guru Dave Akerman's system of choice.
To cut a short story even shorter, with that triumphantly running with the aid of the quick-start guide (prompting a celebratory brandy), I enabled the Picam, logged in and typed raspistill -o image.jpg.
This is a basic image-grabbing command which displays a five-second video preview and snaps the last frame. Splendidly, the result showed the Picam to be fully functional, and capable of delivering a Instagram-worthy shapely Vulture 2 rear-end selfie:

Good news indeed, so we're now set up for camera tweaking and Dave Akerman's in-flight code which automatically records Picam stills and/or video at predetermined altitudes.
That's not the end of the Pi installation story, though. For airborne operations, the rig also has an accelerometer, GPS, Radiometrix transmitter and power supply regulator, as seen here prior to packing into our ill-fated Covert High Altitude Vehicle (CHAV):

The ever-busy Dave and fellow LOHAN team member Anthony Stirk are putting together a dedicated board for these bits, which will sit on top of the Pi and connect via the GPIO. This will tidy the whole thing up, and requires just the two power cables mentioned above.
With the juice hooked up to a rack of AA Energizer Ultimate Lithiums, we'll be good to go. You'll see just where the batteries go when we bring you another exciting update on the final installation of the autopilot and its peripherals. Keep watching the skies...®
More from the lovely LOHAN:
- You can find full LOHAN coverage right here.
- If you're new to LOHAN, seek out our mission summary for enlightenment.
- There are photos our our magnificent Vulture 2 spaceplane here, and detailed structural plans here.
- For your further viewing pleasure, we have all our photographic material stored on Flickr.
- Our LOHAN and Paper Aircraft Released Into Space (PARIS) videos live on YouTube.
- We sometimes indulge in light consensual tweeting, as you can see here.
LOHAN - A Special Projects Bureau production in association with...


