Original URL: https://www.theregister.com/2013/11/26/cold_fusion_revisited_on_a_vintage_macbook_pro/
You DON'T need a new MacBook! Reg man fiddles with Fusion, pimps out vintage Pro
Old school Unibody upgrading with Mavericks and storage tricks...
Posted in Personal Tech, 26th November 2013 10:01 GMT
Feature I need a new MacBook Pro… or do I? It’s probably a question that many a Mac user ponders and, given the choices these days, is much more difficult to answer. Having just reviewed the MacBook Pro 13in with Retina Display, I’m not sure I’m ready to commit myself to soldered RAM and the hope that upgrades will appear for its custom SSD form factor.
For me, it seems like I’m going to have to eke out another year on my Unibody 17in MacBook Pro. At least that way I can hope the passing of time will lower the cost for a decent amount of RAM and a sizeable SSD. And who knows, I might be a Chromebook convert by then.
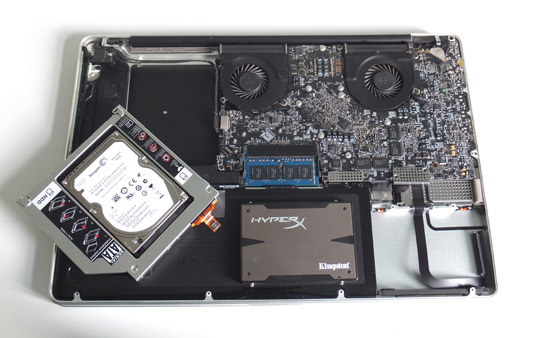
Optical collusion: DVD drive death is a dual drive opportunity
Sadly, the optical drive failed in my MacBook behemoth a while ago, but rather than bemoan its passing, I saw it as an opportunity: let’s have two drives in the beastie – one SSD, one HDD. That’ll sort out the my-SSD-isn’t-big-enough problems and regular offloading of content to an external drive.
With that idea in mind, yet another idea presented itself: a Fusion drive. A hybrid of SSD and HDD tech that, through some clever housekeeping, keeps the regularly accessed files on the SSD and shifts the rest to the HDD. That way, the SSD delivers the performance and doesn’t get filled with detritus and voluminous content.
Meanwhile the more capacious HDD does the heavy lifting, so various music, movie and photo libraries can linger on there along with lesser used apps and system files. The whole arrangement is seamless as you only see one drive on the desktop with the total capacity of the two drives showing as available.
The Macs factor
Apple offers Fusion drives on its iMac and Mac Mini computers, which to most appeared to be the end of the matter. However, last year Cocoa developer Patrick Stein – aka tech blogger JollyJinx outlined how a Fusion drive is created with a few nifty command line keystrokes - and, in the process, revealed that older Macs could be also be configured with one.
Now, that was all running under Mountain Lion, which had me wondering a few things. How easy would it be to rip out the optical drive and replace it with an HDD? Would it successfully marry up with with an SSD to become a Fusion drive and could I do a clean install of Mavericks in the process, all on my MacBook Pro 17in with its Intel 2.93GHz Core 2 Duo T9800 CPU and 8GB RAM?
More to the point, if all went well, just how would the end result perform? This Mac is no spring chicken but with an SSD installed it doesn’t struggle at all with everyday tasks. It also has the full HD anti-glare screen and has done the business as a desktop replacement without serious complaint since I bought it new as a BTO option.

Mavericks downloads to the Applications folder – a curious date, unless you know your Mac history
One other thing is that it will also run Mac OS X 10.6, the last system to support PowerPC software courtesy of translation app, Rosetta. Apple says you can partition a Fusion drive and maybe I could get Snow Leopard on this configuration too and maintain a link with legacy apps. Maybe.
First things first though and I need Mavericks, aka Mac OS X 10.9. The good news is it’s free if you’re running Snow Leopard (10.6), Lion (10.7) or Mountain Lion (10.8). The bad news is that, being a download, you can’t simply boot your Mac from a DVD to do a clean install. One way around it is to create a bootable USB stick.
There are various methods discussed on-line that involve a bit of terminal nerdiness but by far the simplest approach is to use DiskMakerX – a free app which can create a DVD, HDD or a USB installer drive. The way it does all this is to repurpose the Mavericks installer app. The catch being that if you run the Mavericks installer to upgrade your own system, it self-deletes afterwards.

DiskmakerX application allows you to choose an OS X installer from those downloaded
So you’ve got to plan this out properly and although I’ve seen it suggested that simply copying the installer elsewhere first to use later will suffice, I didn’t have any success with this approach. For some reason the end result wouldn’t boot. What did work was to download Mavericks, leave it in situ in the Applications folder and then let DiskMakerX work its magic.
I think part of the problem was that I was booting the Mac from an external USB enclosure that contained a full working Mac OS X installation on a 30GB SSD that I use for diagnostics. I’d downloaded Mavericks onto this drive but as it wasn’t the resident SATA drive, putting together a bootable USB installer from this set-up didn’t play nice.
Give it some stick
Since I would have the back off the Mac soon, I whipped out the Mac’s old SSD and put the 30GB drive in its place and then went through the motions of using DiskMakerX. After not too long – you might want to make a cup of tea, though – I had a bootable installer on an 8GB USB stick.
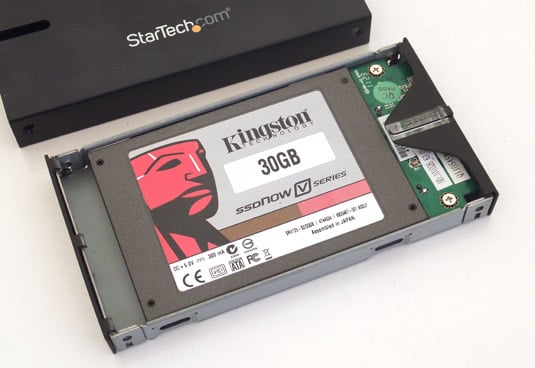
A handy bootable external 30GB SSD used for diagnostics and can be temporarily installed inside the Mac for various other duties that rely on the internal SATA bus
Just to be on the safe side, I tested out the freshly made installer on another 30GB SSD I have spare. That drive was temporarily attached to the SATA bus of the MacBook Pro. The computer was then booted from the USB stick and then the 30GB SSD wiped clean using the installer’s own disk utilities and then the OS installed onto the SSD.
Time passed but soon enough I had a clean Mavericks install which would come in handy. After all, the MacBook Pro was soon to be kitted out with a 480GB Kingston Hyper X SSD and the 750GB Seagate Momentus HDD. I’d be booting with the 30GB Mavericks SSD from an external USB enclosure to set up the Kingston and Seagate storage as a Fusion drive.
Caddy shacks
Ah, 1.2TB of storage on a laptop. Now that’s what I call a desktop replacement! Yet there was still more to do. That optical drive had got to go for a start, to be replaced with an HDD caddy to fit in the cavity. I’m reliably informed that those looking for a cheap caddy on-line can easily make the mistake of buying one designed for PCs and featuring a SATA to IDE interface. Pah! Amateurs, looking for a bargain, what do they know?
So when my second caddy arrived with its SATA to SATA interfacing, I set to work.
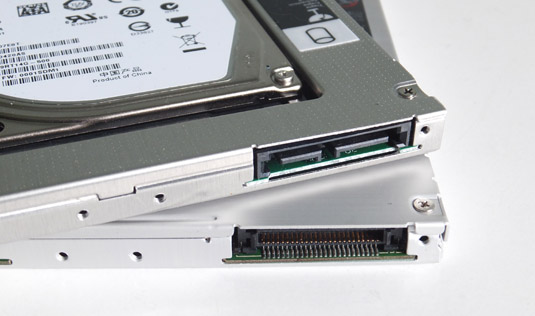
Not all on-line retailers detail important caddy differences: the top one is the SATA to SATA type you'll need for the Mac. Below it is a SATA to IDE type with very different connectivity used on some PC laptops
You’ll find iFixit has covered dual drive installation but I cut a few corners and skipped a few steps, so to speak. For instance, I simply unscrewed the Bluetooth board that’s attached to the optical drive by two screws, rather than get messy with its housing and detaching wires. I can’t see why they bothered.
One other thing about the caddy, the drive is held in place by long screws that are buried in the casing and need a Philips screwdriver with a narrow shaft to be able to reach them. A Torx 7 screwdriver was required too, to swap over the internal drive stud mounts, and for a small, curious detachable bracket by the optical drive, that can get in the way when you’re trying to unscrew this DVD writer from the base.
Putting everything in place didn’t require any major effort and what I would discover now was whether Mavericks would introduce any weirdness to Stein’s Fusion method. Indeed, this was one of the reasons why I went to all the trouble of creating a fully working bootable Mavericks drive, rather than initiate it all using Mountain Lion (OS X 10.8).
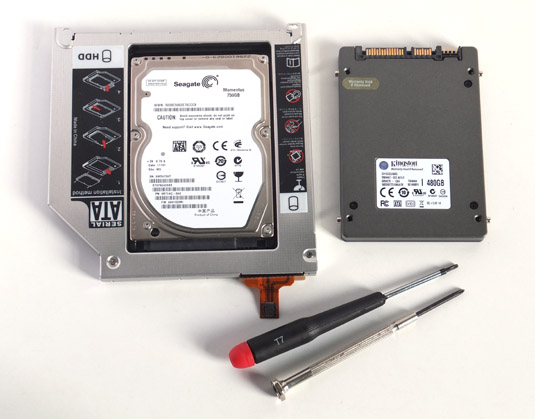
Seagate Momentus 750GB HDD in caddy alongside a Kingston HyperX 480GB SSD
From the various sources I’ve seen that have checked out this build your own fusion drive process, none appear to have tried Mavericks and few have actually refreshed these instructions to highlight what you need to know. Stein was analysing this storage combination and running tests, so a great deal of the Terminal script he presents is irrelevant. It’s interesting, sure, but not necessary.
Bunched together, all these commands look way too scary for the CLI challenged, but there’s really bugger all that needs doing. The process should even be possible using the Terminal app available from the actual installer's menu bar, but I'll stick with using a fully loaded boot drive.
Volume control
So here I am with my Mac booted externally from my Mavericks 30GB SSD and Terminal is up and running – it lingers in the Utilities folder – and I need to establish a few things regarding the different volumes I have here. All I need is a list to give me those details so I can work some magic on the correct drives.
That’s easy: diskutil list
Centaurs-MacBook-Pro:~ centaur$ diskutil list
/dev/disk0
   #:                       TYPE NAME                    SIZE       IDENTIFIER
   0:      GUID_partition_scheme                        *480.1 GB   disk0
   1:                        EFI EFI                     209.7 MB   disk0s1
   2:                  Apple_HFS SSD                     479.2 GB   disk0s2
   3:                 Apple_Boot Recovery HD             650.0 MB   disk0s3
/dev/disk1
   #:                       TYPE NAME                    SIZE       IDENTIFIER
   0:      GUID_partition_scheme                        *750.2 GB   disk1
   1:                        EFI EFI                     209.7 MB   disk1s1
   2:                  Apple_HFS HDD                     749.8 GB   disk1s2
/dev/disk2
   #:                       TYPE NAME                    SIZE       IDENTIFIER
   0:      GUID_partition_scheme                        *30.0 GB    disk2
   1:                        EFI EFI                     209.7 MB   disk2s1
   2:                  Apple_HFS Mavericks xSSD          29.2 GB    disk2s2
   3:                 Apple_Boot Recovery HD             650.0 MB   disk2s3
Hey presto, there it all is. The last drive is the external SSD boot volume, so we'll ignore that.
So let’s combine the other two. This is the cool bit…
Centaurs-MacBook-Pro:~ centaur$ diskutil cs create fusion disk0 disk1
And away it goes producing lots of text following the execution of this short command line. Incidentally, I’ve named the drive “fusion”, whereas Stein calls his “blub". When complete, an all important line of characters appears:
Core Storage LVG UUID: 034016C6-65B5-4C9E-8EAB-943EE07516C4
These characters will be different for every set-up and their use will become clear in a moment. The drive combination still has to be formatted to become a mountable volume. Formatting needs to be performed on the Logical Volume Group (LVG) rather than individual drives and its Universally Unique Identifier (UUID) is used to make that distinction. Below is the cs (core storage) listing for my fusion drive set-up that outlines the different information available.
Centaurs-MacBook-Pro:~ centaur$ diskutil cs list
CoreStorage logical volume groups (1 found)
|
+-- Logical Volume Group 034016C6-65B5-4C9E-8EAB-943EE07516C4
    =========================================================
    Name:         fusion
    Status:       Online
    Size:         1229056622592 B (1.2 TB)
    Free Space:   114688 B (114.7 KB)
    |
    +-< Physical Volume 5F705E05-D330-426F-81CE-A8A133436BF1
    |   ----------------------------------------------------
    |   Index:    0
    |   Disk:     disk0s2
    |   Status:   Online
    |   Size:     479760007168 B (479.8 GB)
    |
    +-< Physical Volume 93836140-1417-49AA-9F56-5A95CDA27D6A
    |   ----------------------------------------------------
    |   Index:    1
    |   Disk:     disk1s2
    |   Status:   Online
    |   Size:     749296615424 B (749.3 GB)
Moving on to the next stage, if you follow Stein’s method exactly, then things get a bit messy because these commands were used to analyse the behaviour of the drive configurations and appear thus:
TIN>diskutil coreStorage createVolume DE85044F-EADA-4F26-93B7-8CD0ADF006EC jhfs+ blub 500g
Scroll the above text to the end of the string and you'll see it finishes with "500g". This means the drive will be formatted to a fixed 500GB capacity, regardless of whether there’s more space available.
Instead of 500g at the end insert: 100%
This will ensure all the available capacity is formatted. So here with my own LVG UUID is how it should look.
Centaurs-MacBook-Pro:~ centaur$ diskutil coreStorage createVolume 034016C6-65B5-4C9E-8EAB-943EE07516C4 jhfs+ fusion 100%
The process is over surprisingly quickly and as far as Mavericks goes, it's evidently still happy to prepare a Fusion drive on older Macs.
All that’s left to do is power down, unplug the external SSD and get on with the clean Mavericks installation on the freshly prepared Fusion drive using the USB stick installer made with DiskmakerX.
Sloppy seconds
installing Mac OS X 10.9 is a two stage process. The first is the “Preparing to install” which is followed by a restart, although not before an unrealistically optimistic message appears declaring “About a second remaining” and ten or more minutes go by. If you didn't make a cup of tea earlier, you should definitely put the kettle on now.
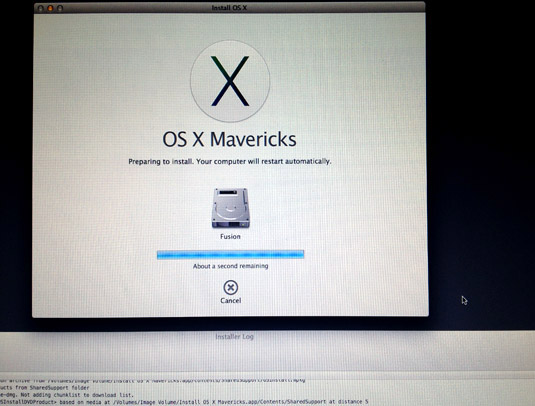
Apple Mavericks clean install: that "About a second remaining" message goes on for quite some time, but you can check the situation from the logs so you know what's going on
Don’t lose heart though, from the choices on the installer menu bar you can view the active log files during the installation, to see what is happening. At this point of lingering doubt, there’s a verification process going on which involves the sizeable Mac OS X installer. As that will be on the USB stick, the access time is slow, especially as older MacBooks featured USB 2.0 not USB 3.0.
After the reboot, the second stage is simply “install OS X” that runs automatically – the speed varying according to set-up. Hopefully you’ll be done in 30mins. And that’s it as far as the Mavericks clean install is concerned. You can start piling on the apps and the Fusion drive will shift the data around according to use. It’s not just a one time process, it continues to keep an eye on the housekeeping here.
Partition walls
Personally, I didn’t notice any loss of performance having shifted from an SSD-only system to the SSD-HDD hybrid Fusion drive. In fact, with a clean install to boot, the system seemed much more responsive, which can’t be said for my office mid 2010 3.6GHz Core i5 iMac, which having only 4GB of RAM and relying solely on an HDD is extremely sluggish since the Mavericks upgrade. Alas, even a blast from Alsoft's ever wonderful DiskWarrior 4.4 (that's also fusion drive friendly) from my handy 30GB diagnostics SSD hasn’t helped this iMac as much as I’d hoped.
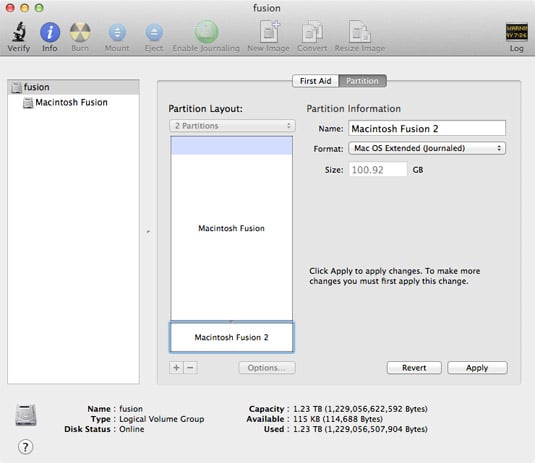
Setting the Fusion drive partition size to 100GB before applying the changes
Last on my list was to be able to partition the Fusion drive to install Snow Leopard (OS X 10.6). Alas, getting this to behave was the only obstacle of all the previous steps. Despite specifying a modest partition size of about 100GB using Disk Utility, the actual process split the drive into two equal halves of around 600GB. I tried various sizes but the same thing kept happening. You can removing the partitioning and it returns to being a fusion drive volume as before.
In its iMac and Mac mini Fusion drive tech note, Apple states only the HDD portion can be partitioned, which would suit me fine for this purpose, if only it worked. Suggestions for achieving a preferred partition size with a Fusion drive using Terminal tricks or other workarounds are welcome in the comments. Indeed, before starting the whole process, I did consider partitioning the HDD first, but wanted to see how this would play out and also presumed the whole HDD would be formatted in the process.
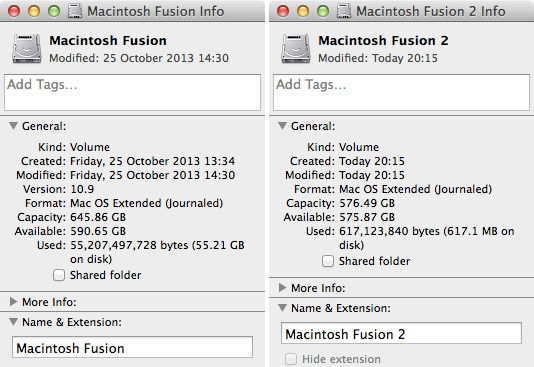
Fusion drive after partitioning: so much for the 100GB second partition, the created volumes are well over 500GB
I'll no doubt give this a go using a smaller pairing of drives with the HDD pre-partitioned to satisfy my curiosity. For now though, the Snow Leopard alternative exists as a bootable external drive and I haven’t used it that often, truth be told. Much like hanging on to an old Mac to run OS 9 (yes, I still have a Power Mac G4 tucked away in a corner) the frequency of running those legacy apps eventually turns into a special occasion to fire up yesteryear’s tech.
That said, all this was done on a Mac that has long since had its day in the sun. For me, using a Sonnet Tempo eSATA ExpressCard34 takes care of a lack of USB 3.0 or Thunderbolt interfacing and having a decent amount of RAM along with its Fusion infusion keeps it performing briskly enough for most tasks. Indeed, its Geekbench 2 64-bit score of 4600 puts it on a par with the ranking of a 2011 MacBook Pro with a 2nd gen Intel 2.3GHz Core i5 CPU.
What I did notice – having been so long without one – was the return of the muted whispering of HDD noise. The MacBook Pro's dual fans are typically softly spoken too, but they soon began roaring away for most of the time, which was a concern. I realised the discrete Nvidia GeForce 9600M GT GPU was active to give better performance. So I switched over to the lower powered GeForce 9400M alternative and things have been calm ever since.

Dual drives and Fusion powered too, however, partitioning is a problem
Even so, the GPU cooling never used to be so fierce on the GeForce 9600M GT, but I do recall there was a screen problem with this set-up apparently overheating, which some speculated was due to thermal paste application issues. It turned out that Apple's firmware 'fix' was to simply keep the fans going. So it's probably Mavericks being rather too enthusiastic here, rather than the Fusion drive at play.
Economy drive?
One thing that can’t be overlooked is the cost. Is it worth it? Admittedly, I have to thank Kingston and Seagate for being open to persuasion here by providing the large capacity storage I used for this workthrough, which would have added up to around £400. The cost can be reduced significantly by using a smaller capacity SSD and a modest sized HDD. So, for a around £100 you can get both a 128GB SSD plus a 500GB HDD and, with any luck, another year's computing.
Also, these drives don't have to be SATA III either, so you might find some bargains. Lest we forget, MacBook owners will have to make room for the additional drive and consequently wave bye-bye to the optical unit. If this internal SuperDrive still works, then eBay awaits – it'll probably pay for a caddy... or two.
If you’re inclined to experiment, even using a small SSD in a Fusion combo will surely deliver performance and capacity benefits – which could make significant difference for users of virtual machines. And when you finally retire your old Mac, you can always repurpose the SSD for diagnostic duties as an external boot drive. None of these options are easily achievable on a new MacBook Pro, which is where I came in: I need a new MacBook Pro… or do I? ®