Original URL: https://www.theregister.com/2011/04/28/feature_hackintosh_on_sandy_bridge/
The Sandy Bridge Hackintosh
Run Mac OS X on Intel's new Core i
Posted in Software, 28th April 2011 11:00 GMT
My challenge from Reg Hardware: build a PC, install Mac OS X on it, and explain how you can do it too.
Today's Macs use standard Intel-type components. A key difference from Windows is that Mac OS X loads though a boot mechanism known as EFI (Extensible Firmware Interface). Some obscure Apple-proprietary concoction, no doubt? Far from it. EFI, now officially called UEFI - the 'U' stands for 'universal' - is an open standard, originally devised by Intel as a replacement for the ageing Bios boot system.
Unlike the 16-bit Bios, EFI can be 32- or 64-bit, and is much more flexible. In particular, with suitable hardware, you can tweak EFI to persuade a Mac OS X installer that it's installing onto a Mac. A generic Intel machine on which you're running the Mac operating system has become known as a "Hackintosh".
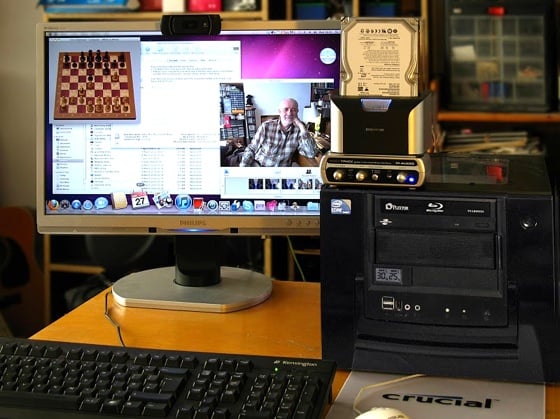
A Hackintosh, yesterday
So What Needs Hacking?
Pioneer Hackintoshers had to hack the official Mac operating system. These days it's easier: you just buy the standard Snow Leopard installation disk from the Apple Store, and rely on EFI to set up the hardware environment and install the necessary kexts.
Kexts, or "kernel extensions", are the Mac world's equivalent of Windows' drivers. They connect intimately with the operating system kernel - the processing centre of the operating system - to allow it to handle hardware components like the Ethernet port, the sound sub-system and so on.
The open source community has become pretty good at developing EFI tweaks and kext modifications to make Mac OS X feel at home with a wide variety of hardware. Recently these core coders have been joined by others who have set themselves the task of presenting all this to the end user in friendly, problem-free packages.
Bottom line: today it's a breeze to build your own Hackintosh, or adapt existing hardware to run the latest version of Mac OS X, Snow Leopard.
Across the Sandy Bridge
To make the challenge a little more interesting, I picked Intel's latest processor technology, Sandy Bridge. The standard-issue Snow Leopard installation disk won't run on Sandy Bridge, but Apple's very latest machines so use the technology, so this looked like a good bet for the future - if I could just get it going for the present.
I chose Intel's microATX DH67GD motherboard with the 2.8GHz Core i7-2600S CPU, a top of the range processor with 8MB of cache. The microATX form-factor suggested a small desktop machine, so I gutted an abandoned Celeron box, swapping the so-so power supply for fifty quid's worth of 500W OCZ500SXS. Cheap power supplies fail, and they can be a bore to replace.
As a boot drive I installed a 128GB Kingston SSDNow 100 V+. Fast, yes, but the key selling point for me about SSDs is that when they fail - as all drives eventually must - they fail in read-only mode. Just buy a new SSD and mirror the partitions across to it. The software to do this even comes with the drive.
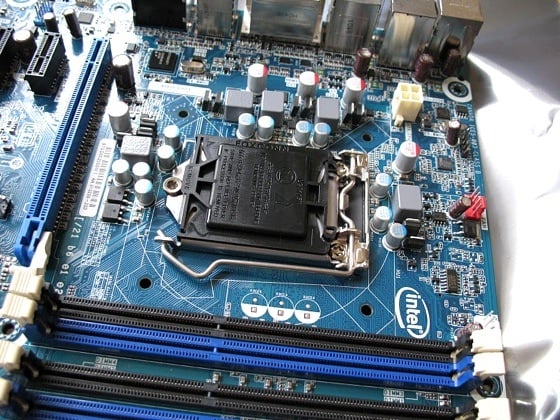
Intel's DH67GD motherboard: this one is from the first batch with the famous Cougar Point chipset problem, known to affect up to 15 per cent of the boards. Working fine so far...
I thought the 64-bit processor worthy of 16GB of RAM, the maximum the four memory slots on the motherboard can take, populated with four sticks of Crucial's unfancy PC3-10600 DDR 3.
As with the hard drives, the optical drive interface has to be Sata, not the now obsolete Parallel ATA, which Snow Leopard doesn't recognise on installation.
The i7-2600S has graphics built in, but the standard Snow Leopard installation disk includes no kexts for this, so I was going to have to add a graphics card. The mid-range ATI Radeon HD 5770 series offers as much power as I'll need - I tried the HIS Radeon HD 5770 and Sapphire Radeon HD 5770, one after the other. Each of these turned out to be recognised by Snow Leopard, giving me 1680 x 1050 resolution once I'd updated to Snow Leopard 10.6.7.
The Installation
First you need to visit your machine's Bios settings to ensure there's nothing there to frighten away Snow Leopard. Switch off any Pata functionality, set HPET (High-Precision Event Timer) to 64-bit, and make sure that AHCI (Advanced Host controller Interface) for SATA devices is enabled. Set the boot priority to CD/DVD, and disconnect all hard drives except the installation target, which is recommended to be on Sata 0.
Another tip is to have no more than 4GB of RAM in the system for the installation. You can always add more once the installation's done.
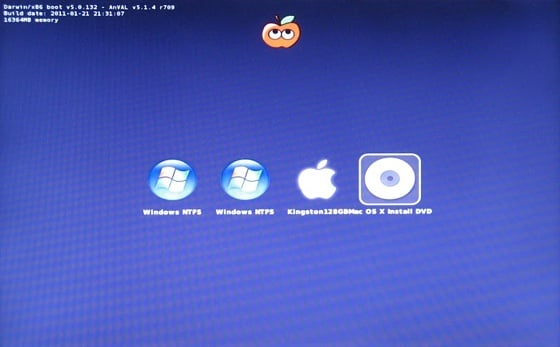
I didn't take my own advice to disconnect other drives. iBoot has detected a couple of Windows partitions as well as the target Apple drive.
At this point if you just stick in the Snow Leopard distribution disk you'll have no luck. The trick is to prepare a bootloader CD that sets up the correct EFI environment, then swap that mid-boot for the official Apple disk. I first tried the iBoot bootloader from Tonymacx86's web site.
It didn't work.
Booting with the standard iBoot disk resulted in a "kernel panic" that sprays the screen with arcane failure reports. The standard kernel is known to fail with Sandy Bridge - it doesn't recognise the CPU. But any sufficiently interesting problem in the open source community gets solved, and work from open source codesters nawcom, Anv, Azimutz, qoopz and others has provided an alternative kernel, the "legacy kernel", that will run on a wider range of processors and motherboards - including the new Sandy Bridge.
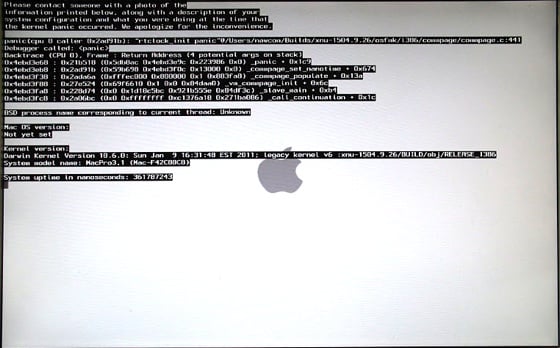
There's no mistaking a kernel panic at installation time. Subsequent KPs may be more inscrutable, merely informing you in multiple languages that you need to reboot your machine.
Tonymacx86's alternative "iBoot Legacy" disc includes this legacy kernel, and this time I achieved lift-off. The boot screen appeared and I swapped out the iBoot disk for the official Snow Leopard installation disc. Hitting F5 refreshed the screen, and when the Snow Leopard disc showed up I selected it, hit Return... and there, after much whirring of the DVD, was the official Mac installation Welcome Screen inviting me to choose my language.
Getting to this point means the installation disc feels at home with your hardware. Niggles may subsequently arise over what kexts will work, and some kexts may even panic your system. But these are details. The basics are solid. You'll find the full steps for using either of the tonymacx86 boot disks here.
Juggling Disks
At this stage, we're still running off the Apple installation DVD, and we need to install everything onto a drive. The installation will be looking around for a suitable disk, and won't find one: you'll need to format the drive before the installation will condescend to settle on it. For this purpose the Mac Utilities menu offers Disk Utility.
Select the target drive in the left-hand column, and pick Partition from the function tabs on the right. Set the Volume Scheme to "Single Partition" and make sure the Format type is "Mac OS Extended (Journaled)". Click the Options button, and make sure "GUID Partition Table" is selected.
Once partitioned, the drive appears as installable, and you can now take a 40-minute break while everything gets transferred across. When you get back, the chances are you'll be greeted by the following message:
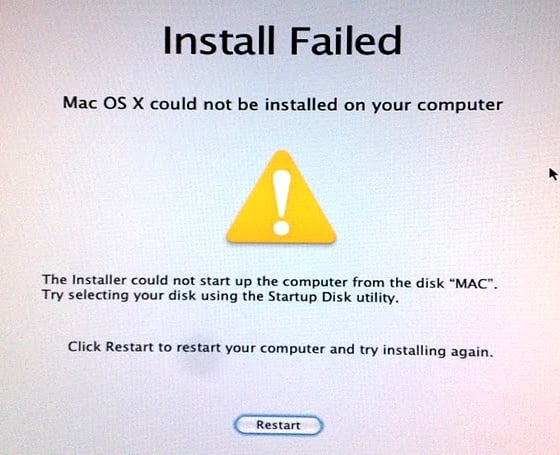
Hmmm. To Thomas Edison failure meant "I've succeeded in discovering yet another way in which this won't work". What you've discovered here is that you still need the iBoot disc. Boot off this again, select the drive on Sata 0... and now discover that the installation has in fact succeeded beautifully.
Beyond the Desktop
Keen Hackintoshers are suffusing netbooks and notebooks with Snow Leopard goodness too, but here the hardware limitations tend to be more stringent. A machine with an Intel Atom processor, 1 GB of RAM, an absolute minimum of 8 GB hard drive space, and the GMA 945/950 graphics chipset is a very likely candidate. If your machine fits this description you can turn straight to mechdrew's guides and use the method based on Mechlort's NetbookInstaller Suite.
My own MSI Wind isn't on the hardware compatibility list (HCL) for NetbookInstaller, but I thought I'd take a punt with it anyway. The NetbookInstaller Suite has two components: NetbookBootmaker, which creates a bootable USB stick for the installation, and NetbookInstaller, which tweaks the installation for your particular hardware. The USB stick created by NetbookBootmaker and the NetbookInstaller app are roughly comparable to tonymacx86's iBoot and EasyBeast.
Following the methods outlined here, I achieved a workable Snow Leopard on the Wind. A key feature missing was the wireless connection, and the recommended fix for this is to replace the wireless hardware - it's normally just a plug-in component - at a cost of between ten and fifteen quid.
Polishing the Installation
The version of Snow Leopard you buy today is 10.6.3, and will need updating to the latest version, 10.6.7 at the time of writing. The recommended way of doing this is to download the official Apple 10.6.7 Combo package. Hackintoshers may also download the tonymacx86 "Multibeast" package.
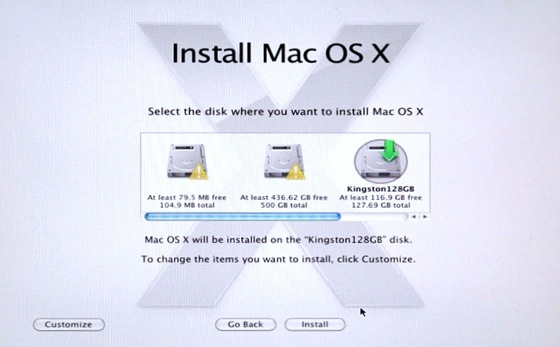
Once the drive has been correctly partitioned, a green arrow indicates that it's the target for installation
Install the Combo package first. It'll invite you to reboot, but before you do that, run Multibeast. It gives you a number of options, so you'll need to check your system and read the documentation to pick the right ones. I needed to enable USB and Ethernet. Now when you reboot you should be able to do this directly off your hard drive, putting the iBoot disk aside.
Hardware Adjustments
The Ethernet gave me an Internet connection, and to test the USB I plugged in a Logitech C910 Webcam - its essential camera and microphone features worked right out of the box, requiring no tweaking or kext fiddling.
The only thing still not functioning is the HD Audio built into the Sandy Bridge motherboard. Future official Mac updates will take care of this. Meanwhile, I've settled for simply plugging in an external USB sound system. I'm using the M-Audio Fast Track box from Avid, but any digital-to-analogue USB sound adapter - 99p on eBay, including postage and packing - should do the job.
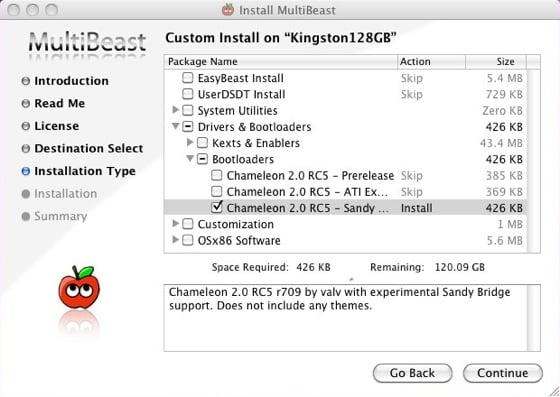
After successful installation, use Multibeast as an easy way to tune up your kexts
One piece of kit that arrived late in the day was the Freecom eSATA Hard Drive Dock. It plugs into the eSATA (external SATA) socket on the motherboard back-plate and allows me drop in 3.5 inch or 2.5 inch SATA drives. I should have had this with me right from the beginning - juggling multiple potential boot drives outside the machine is extraordinarily useful when you're experimenting with operating system installation, giving me a chance to explore Snow Leopard installations in way that just wouldn't be possible with internal drives.
But is it Legal?
The internet is awash with information about Hackintosh building, and I haven't seen any signs of this attracting any cease and desist orders from Cupertino. That's no argument in law, of course, and I'm not a lawyer. But I do know that all the bits of the operating system - EFI, kernel, kexts - that you'll be messing with, or have been messed with for you, aren't part of Apple's proprietary intellectual property. The core of Mac OS X is an open source Unix variant based on BSD Unix.
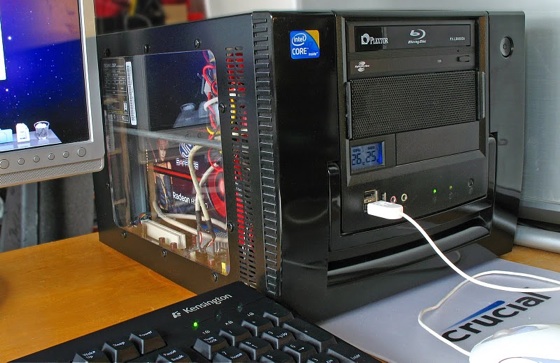
The final build: would adding one of Apple's logo stickers make it entirely legit?
However, as you'll have read in the Snow Leopard End User Licence Agreement - and of course we all always read these EULAs - "You agree not to install, use or run the Apple Software on any non-Apple-branded computer..."
You're on your own with this. I'm in some doubt myself about the legal standing of "non-Apple branded" in this context. The Snow Leopard distribution disk you bought in the Apple store conveniently provides you with a pair of white apple-shaped stickers, presumably to attach in some way to your computer. Does your Hackintosh with such a sticker attached become "Apple-branded"?
I think the decision is up to you. ®