Original URL: https://www.theregister.com/2008/10/17/netbook_linux_guide_1/
The netbook newbie's guide to Linux
'We're the Fukarwi'
Posted in OSes, 17th October 2008 14:12 GMT
Episode One Thanks to their design as appliances, you can get down to useful work straight away with any of the new breed of Linux-based netbooks. But sooner or later, a fair few folk come up against the unfamiliarity of Linux. And, like the legendary tribe of pygmies, you may find yourself jumping up and down in the head-high long grass shouting out the incantation that gave the tribe its name: "We're the Fukarwi."
This series is designed to address that cri de coeur.
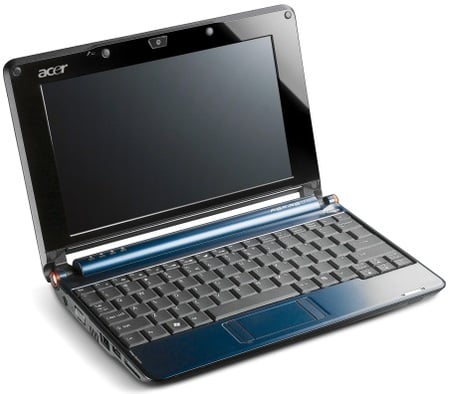
Let's plunge straight into the practicalities by taking a look at Acer's Aspire One - the AA1, as its fans call it. This is a typical Small, Cheap Computer (SCC), in that it runs a simplified version of Linux - unattractively called Linpus - that has been locked down to turn the machine into an appliance. Even a seasoned Linux hacker - and I've been writing about and using Linux since 1995 - has to scratch his head and do some serious Web research before finding the way in. The two chief problems are: a completely unfamiliar simplified appliance-style interface; and the lack of any password to get into the root.

Acer's Aspire One: the appliance of Linux
These two hurdles turn out to be largely illusory. The interface is an old Linux standby called XFCE, tailored to Acer's requirements. And although Acer doesn't tell you the root password, it's left a perhaps deliberate security hole that allows you to change it to the password of your own choice. More about that next time.
The first thing any Linux aficionado would want to do is open a command-line terminal. You can do this easily enough from the official Acer interface: go to the Files area, open My Documents and select Terminal from the File menu. From the command line, we can use the simple but sophisticated 'package manager' - Linux buffs call application downloads 'packages' - provided with the system to produce an inventory of our software assets. It's called yum, an acronym that will become no clearer when I tell you it stands for Yellow Dog Updater, Modified. If you want to know more about yum you can look it up on Wikipedia.
Dave the FingersWe called him "Dave the Fingers" because the first thing he'd do with any operating system on any hardware was dive down into a terminal window and start investigating the innards at command-line level, his fingers flying across the keyboard with lightning speed. Dave Williams of IBM UK has been my friend, colleague and an indispensible font of Unix wisdom since I first got started with Linux in the mid-1990s, and was always the first person I'd turn to for sanity checks on anything I write about the subject. I was saddened this week to learn of his death, and I miss him terribly - particularly in the context of putting this series together. So let me dedicate it to him, and when you e-mail me about any howlers I may have perpetrated here I can blame them on his untimely absence. |
I'm not just going to tell you to type mysterious command lines and take them on trust. I do think we need to know a little bit about what we're doing, although I'll try not to get bogged down in a lot of unnecessary detail. The command line you'll be typing now is as follows:
sudo yum list | less
Sudo is a command that says: OK, I don't have supervisor status on this machine - I'm not 'root' - but please treat the command that follows as if I did. Provided I'm on a list of approved sudo users, yum evokes the package manager, and the list parameter tells yum to give me a list of stuff.
I'll look at why you need sudo, and what root is all about, in a future column.
The character, | is a called a 'pipe'. It's an instruction to feed the outcome of the previous command into the command following the pipe. Less works like more in DOS - more or less - as a full-screen text display that allows you to step through the output, page by page. You can exit from less by hitting the Q key. Try it.

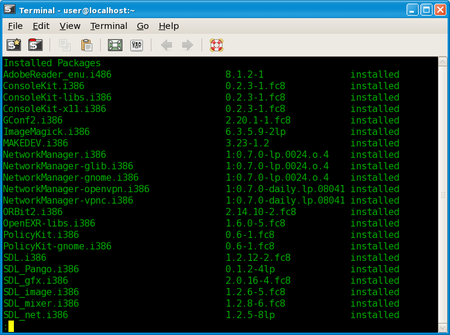
Yum in the Terminal
Not all forms of Linux use yum. The Eee PC, for one, uses apt-get - short for Advanced Packaging Tool - which does the same job.
If you're already connected to the internet, you'll notice that the list you get isn't just an inventory of what's on your machine. It consists of three columns. The left-hand column lists the name of the program or component, the middle column gives you its version number and the third line confirms whether that component is installed or available elsewhere online. In this case, elsewhere is Fedora, an online repository of the version of Red Hat Linux on which Linpus is based. In theory, this means you can use yum to install a new Fedora packages on your AA1, but I don't recommend trying that at this early stage.
There is one really useful thing we can do, however. If, like me, you have other machines attached to your network offering Windows fileshares, the AA1 will appear to know nothing about them. It can only browse files on the local machine. So what we're going to do now is 'mount' a Windows share as if it were part of the AA1's own local file system. Linux in general does a superb job of accessing Windows shares through a technology called Samba. Samba provides a Windows-compatible file system called cifs, and a utility to mount this file system called mount.cifs. But don't worry about it. The ordinary mount command knows to use mount.cifs if you evoke it with the -t cifs parameter. And mount.cifs is smart enough to insert the relevant filesystem module (cifs.ko) into the OS' kernel automatically.
ForumsThe user base for netbooks is growing fast. The following forums deal with the netbooks we've been discussing here: The Asus Eee PC series: forum.eeeuser.com The Acer Aspire One: www.aspireoneuser.com/forum/ The MSI Wind: forums.msiwind.net |
We'll start by creating an empty directory, the 'mountpoint'. In accordance with long Unix tradition, this belongs under the /mnt directory. Navigate there with the following terminal command: cd /mnt
...and create the directory there like this:
sudo mkdir mountpoint
Of course, mountpoint is just an arbitrary name - you can call it whatever you like. Now we're ready to do the business:
sudo mount -t cifs -o user=bidmead,pass=whatever //192.168.1.11/MyShare /mnt/mountpoint
This kind of mount command can only be carried out by the superuser - the system supervisor - which is why we proceed the command with sudo. The -o flag tells mount that an extra parameter follows, and as it's only a single parameter there can be no spaces in the string defining the username and password. Obviously, you'll insert your own username and password here. Likewise, your networked machine's IP address and share name.

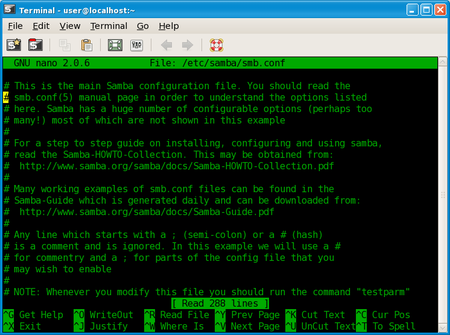
Editing smb.conf in Nano
Now use the standard AA1 interface to run the File Manager app. By default, it won't let you navigate to the root of the Linux file structure, so you'll have to insert a / up in the navigation bar to get there. Now go to the mountpoint you created, and you should see your Windows files there. If you have trouble accessing them it may help to loosen up the permissions you've set on the shares at the Windows end.
Users of the Asus Eee PC may be amused at these shenanigans. It's true that the Xandros version of Linux supplied with the Asus machine comes with a File Manager that already knows its way around a Windows network. And if your Windows Workgroup has the default name of "WORKGROUP", you'll be okay. My workgroup happens to be called "BIDSOWN", and the Asus GUI doesn't seem to provide a way of changing this.
But it's easy enough from the command line. Again, you need to become the root user - the supervisor - or use the sudo command. The machine's Windows workgroup is defined in a file called smb.conf which is in the /etc/samba directory. This is pretty well standard, and the MSI Wind's Suse Linux implementation keeps smb.conf in the same place, except that its default workgroup name is TUX-NET.
The Wind offers a comprehensive GUI route to setting the Windows workgroup name through the front end to its system configurator, Yast - it stands for Yet Another Setup Tool. But it's simpler just to edit smb.conf directly. For this we'll use less again. For safety's sake we'll make a backup of this file first:
sudo cp /etc/samba/smb.conf /etc/samba/smb.conf.orig
Now we'll use less again:
sudo less /etc/samba/smb.conf
Scroll through until you find a section marked "[global]" and a line that says "workgroup = <something-or-other>". Less is a viewer, not an editor, but if you hit the 'v' key it will run whatever utility has been set up as the default editor. In the case of the MSI Wind, this editor will be the venerable old Unix standby, vi. I don't need to tell you how to use that here, because the MSI Wind Suse Linux implementation comes complete with all the Unix man - for 'manual' - pages. If your machine is an MSI Wind, just type man vi. Eee PC users also have the man pages - they're missing from the AA1, though - but they won't need them here because the default editor is the very much easier to use nano, which offers a self-explanatory interface.
Next Time... After dipping a tentative toe into the Linux command line, it's time to start wading up to our ankles by exploring some of the basic commands common to the various Linux implementations - as well as discussing the differences between them.
The Important Bits
- Apt-get - the command-line application installer on most Linux systems.
- Root - the nickname for the user with full access to a Linux system. Also the name of the top of the file hierarchy, which is written as /
- smb.conf - the Samba Windows file-sharing system's configuration file. You'll find it in
/etc/samba/ - Sudo - the command that gives you run a second command as if you had full access to the system.
- Terminal - the beginning, not the end, of Linux.
- Yum - the Acer Aspire One's command-line application installer.