Original URL: https://www.theregister.com/2008/09/01/openvpn_primer/
VPN security - if you want it, come and get it
Attention WiFi hotspotters: You want it
Posted in Security, 1st September 2008 16:02 GMT
If you value your privacy and use Wi-Fi hotspots or other public networks, there is no tool more indispensable than a virtual private network. Yes, technologies such as secure sockets layer (denoted by an "https" in a web address) will prevent information transmitted between a PC and a web or email server from being intercepted, but this protection has its limits.
For one, the vast majority of web pages and email services don't offer the option to encrypt your traffic - at all. If you use a pop client to check email from Comcast, Earthlink or just about any other ISP, you're out of luck. Same thing goes for every single query you ever type into Google, Yahoo, WebMD or just about anywhere else.
Plus, even when sites do offer SSL protection during login, the vast majority remain vulnerable to an attack known as sidejacking, which allows anyone connected to your network (think co-workers or the person sipping cappuccino next to you at the Wi-Fi cafe) to read your email or view your calendar entries. This is true even if you entered your password into an encrypted page.
The reality of this insecurity sunk in deep for journalists covering the Black Hat security conference last month, after learning that three rogue reporters used easy-to-use monitoring tools to sniff traffic that traversed the press room computer network. The hack, which was carried out on an ethernet-based network, revealed at least one reporter's password. Who knows how many tell-tale web searches, instant messages or email were also exposed? Were it not for the loose lips of one of the perpetrators, the attack probably would have gone undetected.
Which brings us back to virtual private networks, better known as VPNs. By enclosing net traffic into an encrypted tunnel and funneling it to a trusted server (say, a net-connected machine at home or one controlled by your company), VPNs prevent people monitoring a Wi-Fi hotspot or other local network from making heads or tails of your communications. All they see are encrypted packets. Best of all, this protection extends to every web search, instant message or email you initiate, regardless of the service being used.
Like many small and medium sized businesses, El Reg is too cheap to equip its grunts with any sort of VPN [Have you asked? -Ed], and that exposes one of the great unspoken paradoxes of web security in the 21st Century: One of the most essential protections out there also happens to be the one that's least viable for those who don't work at a bank or Fortune 500 company. This is just plain wrong. Surely, there has to be a better way to secure yourself while surfing public networks.
Enter OpenVPN, a free and extremely powerful open source package that runs on Windows, OS X, Linux and assorted versions of Unix. This reporter has been using it for almost a month now, and it has worked great. James Yonan, the author and maintainer of OpenVPN, has plans to add lots of new features, so there's good reason to think it's only going to get better.
But don't say we didn't warn you: Because OpenVPN interoperates with a server, one or more clients and one or more local area networks, setup can be baffling, especially if you've never installed a VPN before. Indeed, it took this reporter three days to get it working properly. But now that it's installed, it seems well worth the work. OpenVPN already saved our bacon at Black Hat, and who knows where else.
What follows is step-by-step instructions for setting up OpenVPN on two Windows XP machines (one acting as the trusted server and the other as a client surfing the public network). Our apologies to users of other operating systems. While the exact menus and keystrokes don't apply to you, many of the general guidelines may still be helpful.
Housekeeping, subnets, and domain names for dynamic IPs
You'll need a trusted server with an always-on connection to the net. We can't stress enough the the server needs to be free of malware and be connected to a network you trust. We used a home machine with broadband, so these instructions are tailored to that arrangement.
Step 1: Housekeeping
Before installing and configuring OpenVPN, you'll need to take care of several housekeeping items necessary to make the program work smoothly. First, if your client is running on a local area network, make sure its subnet isn't one of the more common IP numbers in use. A bevy of home routers use 192.168.1.x by default, and this will almost certainly pose a problem. If you go to a Wi-Fi hotspot that uses the same subnet as the one used by your server, there will be conflicts and you will be unable to connect.
To prevent this problem, renumber the subnet connected to your server machine to one of the more obscure numbers. We picked 192.168.199.1, but as this list makes clear, there's no shortage of available of private IPv4 addresses to choose from. This is how the configuration page of our Linksys router looked after the change.
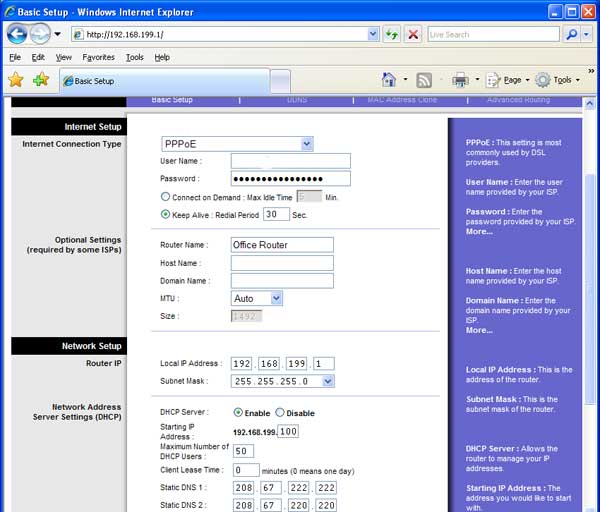
Change the subnet to 192.168.199.1
While you're still in your LAN settings, identify a chunk of addresses in your subnet that won't be used by any other machines connecting to the network. We picked 11 addresses starting at 192.168.199.151. Jot this information down. You'll need it later.
Step 2: For Servers with Dynamic IP Addresses
If the IP address of your server machine isn't fixed and you don't already have one, you'll need a domain name mapped to the IP address of your server machine. (If the server has an IP address that never changes, you can skip this section and proceed to step 3.) DynDNS allows you to do this for free using their Dynamic DNS service.
You'll need to create an account that includes a username and password. Be sure to pick a strong combination and keep it handy, because you'll need it in a moment or two. Now, log in to the account you just created and choose the Add Host Services link. This will allow you to create your very own domain name that will automatically map to your server machine. To do that, type in a domain name, select the "Offline Hostname" option, and click on the "create host" button at the bottom of the page.
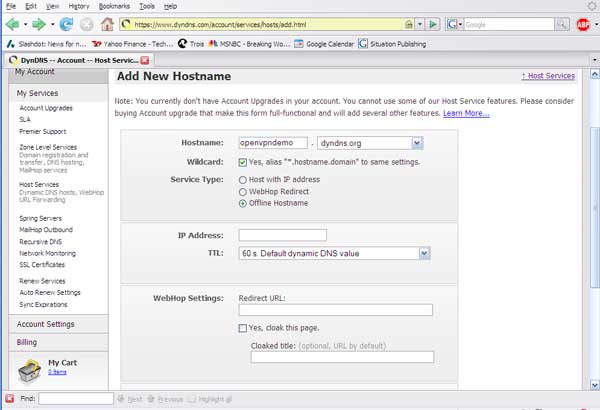
Choose a domain name to map to your server
We chose the domain name openvpndemo.dyndns.org. You can pick whatever you want, as long as no one has beat you to it. Just be sure to remember what the domain name is, because you'll need it later in the configuration process.
Now, download the DynDNS Updater software from this link and install it on the server machine. Choose the default setup options. When it opens for the first time, you'll be prompted for a username and password. Enter the username and password you just established when you created your DynDNS account.
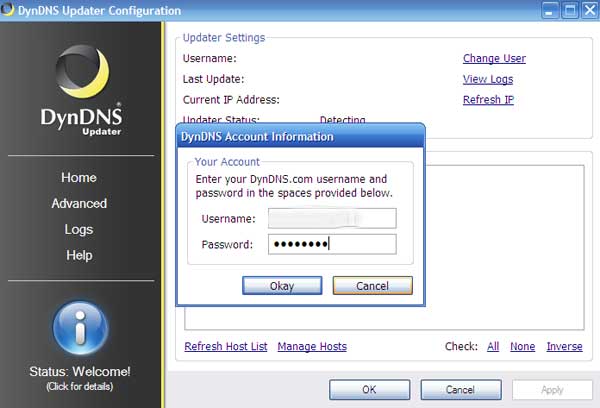
Enter the username and password for the account you just created
Once you enter the username and password, DynDNS Updater will display the domain name you just created in the "Dynamic DNS Hosts" section. Check the box and click the "apply" button.
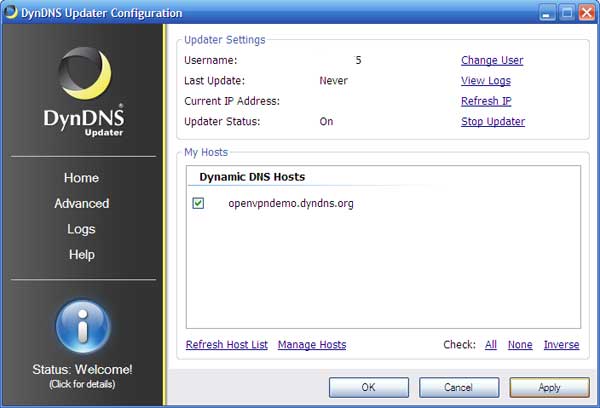
DynDNS configuration page
Presto, you have now set up a domain name for your server machine. Each time its IP number changes (assuming its a dynamic setup) DynDNS will update the domain name accordingly. The DynDNS icon should now show in your system tray.
(If you're having problems with this step, DynDNS offers their own instructions here.)
Step 3: Installing and configuring OpenVPN
Navigate to OpenVPN's downloads page and download the software that fits your machine. In most instances, you'll want to download the most recent stable release of the installer, which for Windows, at time of writing, was the OpenVPN-2.1_rc9-install.exe.
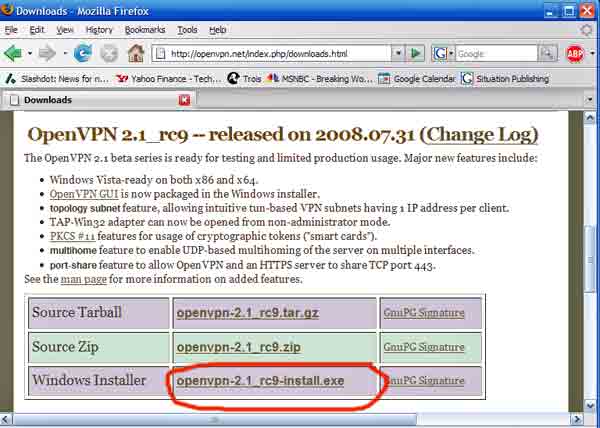
Download the most recent stable release
Install the program on both the server and client. Be sure to accept all defaults options during installation. If Windows XP displays a message warning that a "TAP-Win32" adapter or "ZRTP Miniport" haven't passed logo testing, don't worry. Just click "Continue anyway" each time the message is shown.
Time to Manage the Keys
OpenVPN gives you the option to use a symmetrical key for the server to authenticate itself to the client and vice versa. This makes the key management significantly easier, but it also diminishes significantly the security of the entire system by eliminating a powerful feature known as perfect forward secrecy. So whatever you do, DON'T USE THE SYMMETRICAL KEY OPTION.
Instead, use OpenVPN's public key infrastructure (PKI), which is much harder for intruders to break. You'll need to generate a certificate authority and separate keys for the server and each client that connects, but the increased security far outweighs the extra work.
Generating and distributing the SSL keys needed for OpenVPN isn't the most intuitive of tasks but thanks to the set of key management scripts included with the OpenVPN package you just installed, you have everything needed to get the job done. To access them, go to the machine that will act as the server and open up a command window (by choosing Start > Run and typing cmd and hitting enter) and type "cd \Program Files\OpenVPN\easy-rsa" (minus the quotes, here and throughout this manual). Your command prompt should now read: "C:\Program Files\OpenVPN\easy-rsa>". Now type the following commands:
init-config
vars
clean-all
build-ca
The first three commands will generate little in the way of a response from your computer. But after typing the last command, you'll be prompted for all kinds of information including your two-letter country code, and state or province. Feel free to enter in the correct information, or leave most of it as is. The only field that must be entered is the Common Name. Enter something like OpenVPN-CA. Congratulations, you have just created your certificate authority key.
Your wish is your command window
Here's what your command window should look like once you've gotten this far:
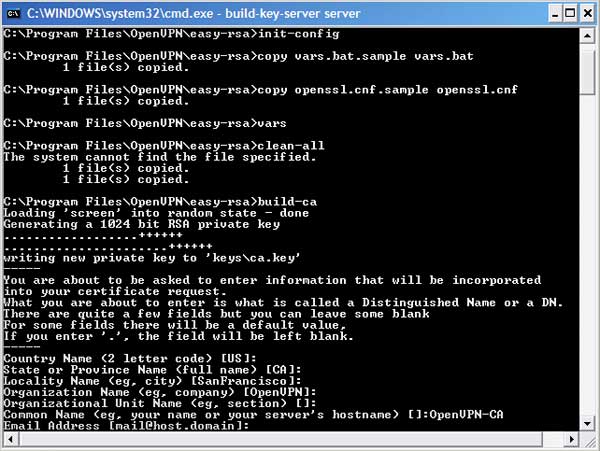
Command Window after generating certificate authority key
Now it's time to create the key for the server. To do that, keep the command window open and type:
build-key-server server
Like the last command, you'll be prompted for information. You can leave all fields, including the one asking for a challenge password, blank. The sole exception is the Common Name field. When queried for Common Name, enter "server". When asked to sign the certificate, enter y for yes. When asked to commit, enter y again. You have just created the key pair that will be used by your server.
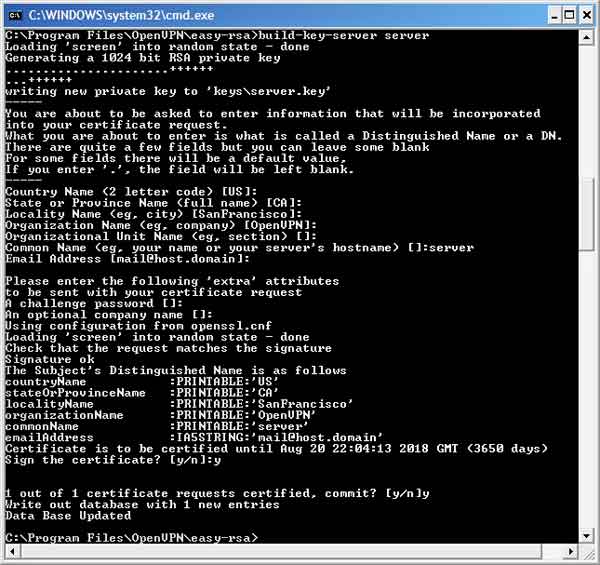
Command window after generating server key pair
Now it's time to create the key pair to be used by your client machine. To do so, keep the command window on your server machine open and type:
build-key-pkcs12 client1
This command will generate a key pair that can only be accessed by typing in a passphrase of your choice. As in previous cases, you can leave most entries blank, with the exception of Common Name. For that field, enter "client1". When asked to enter a challenge password, leave the field blank. When asked to sign the certificate, enter y for yes. When asked to commit, enter y again. Next, you'll be asked to enter and re-enter an export password. This step is important, because it will prevent a thief from accessing the VPN in the event the client computer is stolen. Choose something good, and be sure to remember what it is.
You have just created the key pair that will be used by your client.
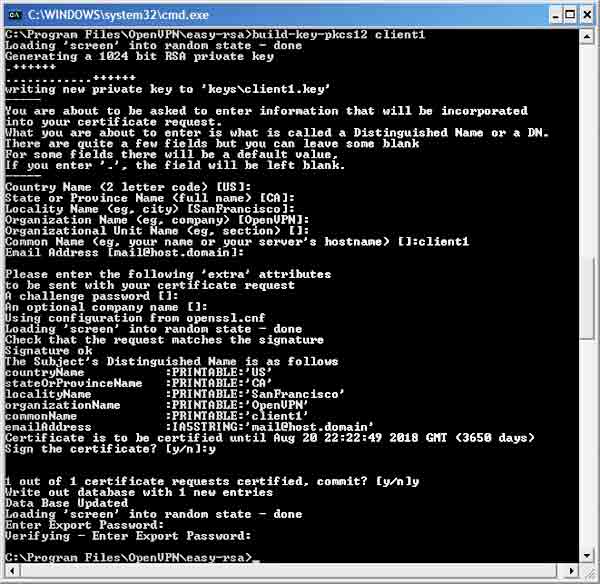
Command window after generating client key pair
If you've gotten this far, you've successfully generated all the keys needed to connect a client to a VPN server. Double click on the folder located at C:\Program Files\OpenVPN\easy-rsa\keys and you'll find the keys.
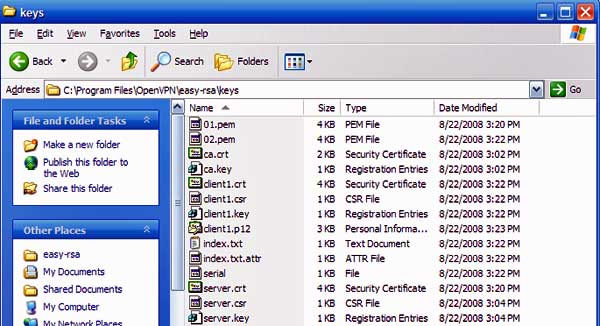
Keys folder after keys have been generated
Now, it's time to put the keys in the proper locations. The most important file in the entire bunch is the one titled ca.key. This is the certificate authority that is used to generate new keys for clients that connect to the server. If it's lost, it will be impossible for additional clients to connect to the VPN server. Even worse, if it's stolen, it will be possible for the thief to connect to the server. Keep the ca.key file in a highly secure location, i.e., one not connected to the internet.
The next three files to pay attention to are ca.crt, server.crt and server.key. Copy all three to the folder on the server machine located at C:\Program Files\OpenVPN\config. Finally, going back to the C:\Program Files\OpenVPN\easy-rsa\keys, locate the file called client1.p12. This file needs to be copied to the client machine, specifically to the folder located at C:\Program Files\OpenVPN\config.
You have now completed the key management part of setting up OpenVPN.
Configuring OpenVPN
Now it's time to add the configuration files to the server and client machines and modify them as needed.
Download a file called server.ovpn here and client.ovpn here. You'll need to rename the files server.ovpn and client.ovpn and copy them into the C:\Program Files\openvpn\config folders of your server and client respectively.
If you've followed our directions exactly, these files have most of the settings you'll need, but you'll have to add several of them yourself. To do that, start with the server, navigate to C:\Program Files\openvpn\config, and open server.ovpn in any text editor (for example, by right clicking on server.ovpn, and choosing Open with > notepad). Search for the text string "server-bridge". Immediately to the right, you'll find several strings that will have to be replaced with settings that are unique to your LAN:
Replace DEFAULT.GATEWAY with the IP number of the default gateway for your LAN. In our case, this number was 192.168.199.1. Replace SUBNET.MASK with the subnet mask of your LAN. In our case, the number was 255.255.255.0.
In the housekeeping section, we instructed you to find a chuck of IP space in your LAN's subnet that isn't being used by any other machines on your network. You'll need one for each client that connects. Replace BEGINNING.DHCP.RANGE with the first reserved IP address, and END.DHCP.RANGE with the last. When you're done, the line should read:
server-bridge 192.168.199.1 255.255.255.0 192.168.199.151 192.168.199.161
Be sure to save the file.
Now it's time to customize the configuration file for your client. Search for the text string "PLACE.IP.NUMBER.OR.DOMAIN.NAME.HERE". If you created a domain name using DynDNS, this is where it goes. Or, if the server has a static IP address, type it here. Be sure to leave a space between the domain name or IP address and the 443.
In our example, this section of the client.ovpn file will read:
remote openvpndemo.dyndns.org
Again, be sure to save the file.
If you've completed all the steps correctly, the C:\Program Files\OpenVPN\config folder on your server should look like this:
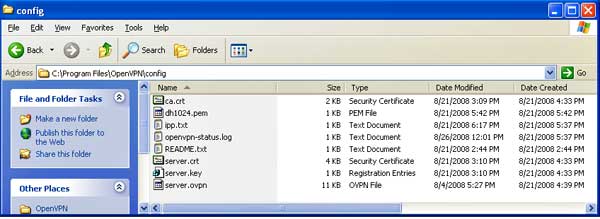
Server config folder after generating keys and adding config file
And the C:\Program Files\OpenVPN\config folder of your client will look like this:
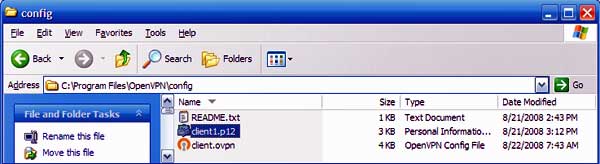
Client config folder after generating keys and adding config file
Step 5: Bridging the Server's LAN
OK, we're nearing the end of this extended journey. One of the last things you'll need to do is make an important change to the Network Connections section of Windows on the server. But first, a word of caution: If your LAN is configured to use a certain DNS server or IP address, you'll have to re-enter all of these settings once you've set the network bridge. It might be a good idea to check the configuration settings and write them down before proceeding.
You may have noticed that with the installation of OpenVPN a new Local Area Connection icon was created. Under the "Device Name" column in the upper right side of the Network Connections Window, there will be the words "TAP-Win32 Adapter V9". Select this adapter and then, with the control button held down, highlight the computer's other Local Area Connection icon. Now right click and it should look like this.
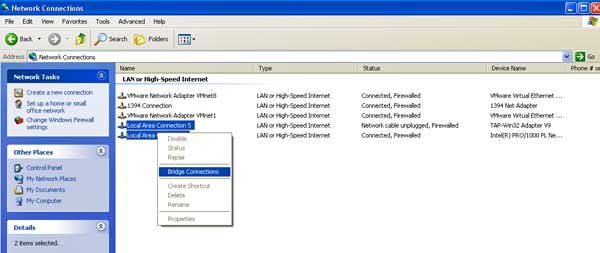
Network connections window before the LANs are bridged
Choose bridge connections and wait a moment. Your Network Connections window should now look like this:
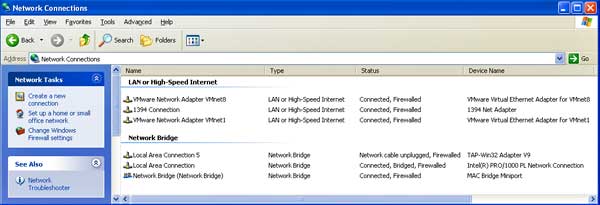
Network connections after LANs have been bridged
As per our warning in the housekeeping section, don't forget to reconfigure the bridged LAN if required.
The moment of truth
Now it's time to fire up OpenVPN and see if you've done everything right. Your client and server will need to be on different local area networks. We accomplished this by taking the client PC to a nearby coffee shop and using LogMeIn to remotely access the server. (You could also fire up OpenVPN on the server, follow the server instructions that follow, and then head to the coffee shop and complete the instructions for the client.)
In either case, double click on the OpenVPN GUI icon that is on your server desktop (and is also in the All Programs > OpenVPN section of your start menu). An OpenVPN icon will appear in your system tray. Right click on it and choose connect. You should see a server connect status window and, 30 or so seconds later, a message indicating the server has connected successfully.
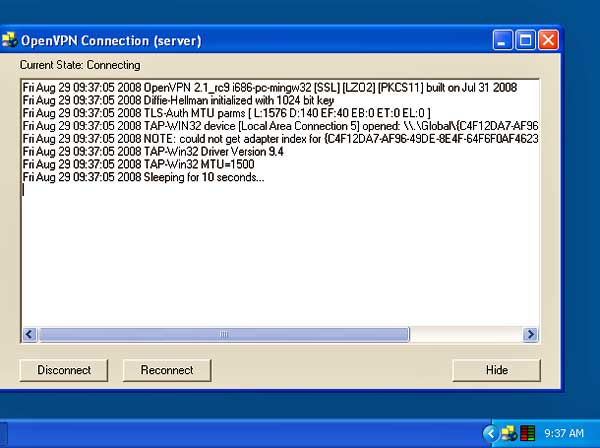
Server connecting ...

Server connected!
Into the Tunnel of Love
Before starting OpenVPN on your client, make sure it's connected to the internet, and make a note of its wide area network IP address by visiting WhatIsMyIP.com. The IP address should belong to whatever provider the coffee shop subscribes to.
Now double click on the OpenVPN GUI icon on the client PC and follow the same steps you took when connecting on your server. Because we created a passphrase for the client key, you'll be prompted to enter it now. You should now see a client connect window and, 30 or so seconds later, a message indicated the client has connected successfully.
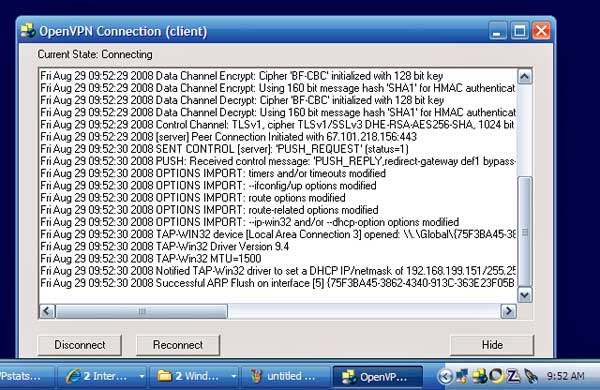
Client connecting ...

Client connected!
Tunnel of Love
If all goes according to plan, within 30 seconds, your client's IP address should change to the same one being used by your server machine. Make sure by once again checking WhatIsMyIP.com.
With the generous help of the Wall of Sheep organization camped out at this year's Black Hat security conference, we monitored a LAN as our packets traveled through OpenVPN's tunnel of love. We can confirm that they were absolutely unintelligible, even when we typed (nonexistent) passwords in the clear using Pop3 email clients and other unprotected programs.
The caveat is that if your client disconnects from the server for any reason, it will automatically resume normal use of the LAN, and if that happens (as it did, briefly, to us at Black Hat) anything you send in the clear is fair game to snoops. (Yonan, the OpenVPN creator, says he's working on an update that will alert users when the virtual connection is broken; until then, you'll just have to be vigilant.)
With the advent of OpenVPN, there's no longer a good excuse to connect to strange networks without the protection of a robust virtual private network. So go ahead and take the plunge. And if you run into trouble, leave a comment. We'll do what we can to help. ®