This article is more than 1 year old
You DON'T need a new MacBook! Reg man fiddles with Fusion, pimps out vintage Pro
Old school Unibody upgrading with Mavericks and storage tricks...
Volume control
So here I am with my Mac booted externally from my Mavericks 30GB SSD and Terminal is up and running – it lingers in the Utilities folder – and I need to establish a few things regarding the different volumes I have here. All I need is a list to give me those details so I can work some magic on the correct drives.
That’s easy: diskutil list
Centaurs-MacBook-Pro:~ centaur$ diskutil list
/dev/disk0
   #:                       TYPE NAME                    SIZE       IDENTIFIER
   0:      GUID_partition_scheme                        *480.1 GB   disk0
   1:                        EFI EFI                     209.7 MB   disk0s1
   2:                  Apple_HFS SSD                     479.2 GB   disk0s2
   3:                 Apple_Boot Recovery HD             650.0 MB   disk0s3
/dev/disk1
   #:                       TYPE NAME                    SIZE       IDENTIFIER
   0:      GUID_partition_scheme                        *750.2 GB   disk1
   1:                        EFI EFI                     209.7 MB   disk1s1
   2:                  Apple_HFS HDD                     749.8 GB   disk1s2
/dev/disk2
   #:                       TYPE NAME                    SIZE       IDENTIFIER
   0:      GUID_partition_scheme                        *30.0 GB    disk2
   1:                        EFI EFI                     209.7 MB   disk2s1
   2:                  Apple_HFS Mavericks xSSD          29.2 GB    disk2s2
   3:                 Apple_Boot Recovery HD             650.0 MB   disk2s3
Hey presto, there it all is. The last drive is the external SSD boot volume, so we'll ignore that.
So let’s combine the other two. This is the cool bit…
Centaurs-MacBook-Pro:~ centaur$ diskutil cs create fusion disk0 disk1
And away it goes producing lots of text following the execution of this short command line. Incidentally, I’ve named the drive “fusion”, whereas Stein calls his “blub". When complete, an all important line of characters appears:
Core Storage LVG UUID: 034016C6-65B5-4C9E-8EAB-943EE07516C4
These characters will be different for every set-up and their use will become clear in a moment. The drive combination still has to be formatted to become a mountable volume. Formatting needs to be performed on the Logical Volume Group (LVG) rather than individual drives and its Universally Unique Identifier (UUID) is used to make that distinction. Below is the cs (core storage) listing for my fusion drive set-up that outlines the different information available.
Centaurs-MacBook-Pro:~ centaur$ diskutil cs list
CoreStorage logical volume groups (1 found)
|
+-- Logical Volume Group 034016C6-65B5-4C9E-8EAB-943EE07516C4
    =========================================================
    Name:         fusion
    Status:       Online
    Size:         1229056622592 B (1.2 TB)
    Free Space:   114688 B (114.7 KB)
    |
    +-< Physical Volume 5F705E05-D330-426F-81CE-A8A133436BF1
    |   ----------------------------------------------------
    |   Index:    0
    |   Disk:     disk0s2
    |   Status:   Online
    |   Size:     479760007168 B (479.8 GB)
    |
    +-< Physical Volume 93836140-1417-49AA-9F56-5A95CDA27D6A
    |   ----------------------------------------------------
    |   Index:    1
    |   Disk:     disk1s2
    |   Status:   Online
    |   Size:     749296615424 B (749.3 GB)
Moving on to the next stage, if you follow Stein’s method exactly, then things get a bit messy because these commands were used to analyse the behaviour of the drive configurations and appear thus:
TIN>diskutil coreStorage createVolume DE85044F-EADA-4F26-93B7-8CD0ADF006EC jhfs+ blub 500g
Scroll the above text to the end of the string and you'll see it finishes with "500g". This means the drive will be formatted to a fixed 500GB capacity, regardless of whether there’s more space available.
Instead of 500g at the end insert: 100%
This will ensure all the available capacity is formatted. So here with my own LVG UUID is how it should look.
Centaurs-MacBook-Pro:~ centaur$ diskutil coreStorage createVolume 034016C6-65B5-4C9E-8EAB-943EE07516C4 jhfs+ fusion 100%
The process is over surprisingly quickly and as far as Mavericks goes, it's evidently still happy to prepare a Fusion drive on older Macs.
All that’s left to do is power down, unplug the external SSD and get on with the clean Mavericks installation on the freshly prepared Fusion drive using the USB stick installer made with DiskmakerX.
Sloppy seconds
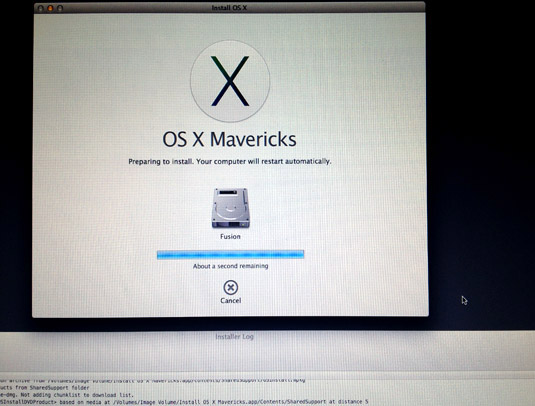
installing Mac OS X 10.9 is a two stage process. The first is the “Preparing to install” which is followed by a restart, although not before an unrealistically optimistic message appears declaring “About a second remaining” and ten or more minutes go by. If you didn't make a cup of tea earlier, you should definitely put the kettle on now.

Apple Mavericks clean install: that "About a second remaining" message goes on for quite some time, but you can check the situation from the logs so you know what's going on
Don’t lose heart though, from the choices on the installer menu bar you can view the active log files during the installation, to see what is happening. At this point of lingering doubt, there’s a verification process going on which involves the sizeable Mac OS X installer. As that will be on the USB stick, the access time is slow, especially as older MacBooks featured USB 2.0 not USB 3.0.
After the reboot, the second stage is simply “install OS X” that runs automatically – the speed varying according to set-up. Hopefully you’ll be done in 30mins. And that’s it as far as the Mavericks clean install is concerned. You can start piling on the apps and the Fusion drive will shift the data around according to use. It’s not just a one time process, it continues to keep an eye on the housekeeping here.
